Search This Blog

Tuesday, July 28, 2015

BURLAP SCARECROW MASK

Sinister Sisters loves scary scarecrow masks.  For this mask, we simply repeated the mantra "anything goes!"


SUPPLY LIST
Styrofoam head
burlap
spray adhesive 
jute rope
jute twine
small paint brush
brown acrylic paint
black acrylic paint 
sewing needle (large eye)

Starting with a Styrofoam head that I bought at a local beauty supply store, I taped the Styrofoam head to my work table to make designing my burlap mask easier.


Next, generously spray  the  Styrofoam  head with  a  general  purpose glue. 


Lay your piece of burlap on the top of your Styrofoam head. Fold, pinch or smooth the burlap over the form.  You should be able to re-position your burlap if you need to.  At the very least, create a suggestion of a mouth. 


After the burlap is formed to the face of your form, the back of your head can just randomly be folded then tied at the neck with the jute rope.  


Now it's time to thread your jute twine.  I whip stitched and randomly sewed to create the mouth, eyes and nose.  I suggest scar tissue and the look of a eye sewn shut.  Sew down most of the burlap folds leaving a few alone.  For scarcely growing hair, tie a knot with the twine leaving several inches hanging. It curls on it's own and looks really creepy!


Maybe a button eye?


The last step is to make the mask look old and dirty.  Use black and brown acrylic paint to enhance shadows.  Dilute the paint if necessary.


Display your burlap mask on a pedestal or incorporate it into your DIY prop monster!

Check out our Pinterest page for more Halloween decorating ideas! 

Follow and "like" us on Facebook! http://www.facebook.com/public/Damato-Danali


Monday, July 27, 2015

MAKE YOUR OWN FRAMED HORROR ART

Sinister Sisters produces a home haunt that has a look and feel of everyday living in a house that's haunted.  One way you can accomplish this is by replacing your current framed art with framed horror art!

Frequent yard and estate sales, junk and antique shops to collect as many old frames as you can find.  The older, the better!  With a broken hanger and chipped finish, our junky frame was definitely on it's last leg!

Keep a look out for a great mask, preferably of an animal or something just plain creepy!  This is a warewolf mask found at the drugstore.


Hang your junk frame anywhere new on your wall or simply replace existing framed art with your tattered, open back frame.  We let the broken hanger string hang free.  It adds to it's creepiness!  Center your mask in the frame. Minimize holes by using only one or two thumbtacks to attach your mask to the wall from the inside.


For this abstract framed horror art, we used two frames that are similar in style.  Hang them, one inside the other and fasten any creative object in the center of the smaller frame.  Our headless doll was given to the Sinister Sisters by a person who knew we'd put it to good use!


Framed horror art made our home haunt feel realistically creepy.  Many people say these were their favorite decorations!

Check out our Pinterest page for more Halloween decorating ideas! 

Follow and "like" us on Facebook! http://www.facebook.com/public/Damato-Danali


Wednesday, July 22, 2015

WRITE A QUOTE ON ANY WINDOW OR MIRROR WITH VINYL LETTERS

I love a good quote on a window or mirror!  This is easy to accomplish but, it does require a little measuring and math. Check out where we used our framed mirror then, create your own mirror quote for your special occasion!


The Sinister Sisters produce a horrifying home haunt for their friends every Halloween but we also create a whimsical, all white Champagne Bubble Lounge under the trees, lighting the area with black light, making everything glow-in-the-dark! The lounge space is decorated with several upholstered pieces of furniture, all with white slipcovers on them .  White rugs are placed on the ground and a few white lacquer tables complete the space.  A large mirror with a quote on it sounded like a perfect addition to our Bubble Lounge!

This quote was centered on the mirror with an even amount of space around the outer edges.  I found some pre-cut vinyl letters at the big box store. There were two sizes in the package so it was perfect for my design idea. With a little planing on paper and preliminary placement on the mirror, I was ready to commit to my plan.  Remember, I chose vinyl lettering because it can be repositioned and isn't permanent! 

There's no right or wrong way to do this project.  Create your quote using different fonts or maybe incorporate graphics into your design.  Consider a quote on a bathroom mirror or a window!


The quote Sinister Sisters chose for our mirror was "time to drink champagne and dance on the table".  ...says it all!

Check out our Pinterest page for more Halloween decorating ideas! 

Follow and "like" us on Facebook! http://www.facebook.com/public/Damato-Danali


Monday, July 20, 2015

HALLOWEEN DIY CHAIR REDUX

Sinister Sisters strives to create a spooky lived-in atmosphere when designing for our annual home haunt.  We make everything from the kitchen chandelier to the household furniture look like we live in an old haunted house year-round!  Being a designer, I couldn't help but want to make a custom piece that helps the house feel intimate but haunting at the same time.  Here's what I came up with, a burlap upholstered chair with a hand stenciled design.


While on one of our antique shopping trips, looking for Halloween decor, Sinister Sisters found this old chair at our local antique mall.  I thought it looked kinda Gothic.  It was a little banged up but, I was going to paint it black and thought that the dings would just add to it's character!


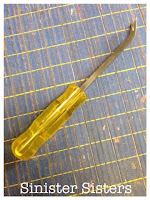
My first step was to strip the materials down to the frame by removing all of the old fabric, staples, batting and foam.  If you have the right tools it's easy!  I  used  this staple removal tool used by upholsterers.  A slotted screwdriver works too but, be careful!

The foam seat was still in good shape so, I used it again.  I added all new batting to soften and refresh the chair.  If your chair needs new foam, replace it.  We don't really want stains, rips or cobwebs on it!

Since the paint would need some drying time, I painted the frame first before stenciling the burlap.  I painted 2 even coats with black Rust-Oleum "American Accents" semi-gloss. This paint is fantastic for wood because it seems to be a thicker paint than the average and makes it easy to paint in an even fashion. I sprayed 2 layers lacquer on the frame for added protection and shine.

Spray paint your frame 2-3 times.


Spray  lacquer over the  painted  frame for added  protection.

I only use designer quality burlap on new projects.  It's tightly woven, sanitary and best of all it doesn't smell!  First, I stenciled a simple pattern around the edge of the seat and seat back with a ready made plastic stencil using black cream paint.  For bold coloring, I use Royal Design Studio's Royal Stencil Creamhttp://royaldesignstudio.com    It's soft and dries in minutes. I also love using a quality cream paint. You can make this paint as dark or light as you want and even create shadows for a dimensional look.  


On the seat back, I designed and cut a skull pattern using the freezer paper method.  Position and iron your freezer paper pattern to the burlap and stencil away!  I added a border around this part too.

After your done stenciling, it's time to upholster!   Position your foam, batting and burlap on the seat board and directly to the back chair frame using an electric stapler.

I lined the burlap with some black fabric so white wouldn't show through.


First, the seat back burlap piece was stapled directly to the chair frame. Cover your staples by gluing gimp or double cord around the raw edges.  I used black eyelash gimp. 

Next, the seat burlap piece was positioned to be centered making sure it lined up with the pattern on the back of the chair.  

I didn't want to leave the back plain so, I made a spider stencil, also using the freezer paper method, for a little added surprise.  This chair was placed away from the wall so it could be seen from all sides.


I love how this chair turned out!  I can't wait to create another Halloween  chair   redux  for  Sinister  Sisters  annual   haunt!

Check out our Pinterest page for more Halloween decorating ideas! 

Follow and "like" us on Facebook! http://www.facebook.com/public/Damato-Danali


Friday, July 17, 2015

MAKE AN EASY HALLOWEEN ENTRANCE

Here's a simple way to make any doorway spooky for Halloween!  I'm afraid I don't have any "how to" photos but, I think that this project is easy enough to describe.

Strangely enough, Sinister Sisters came across a garage sale at a local haunted house!  Right off, we spotted this full head mask used to frighten their patrons.  We didn't know what we were going to do with it but, we were pretty sure we'd think of something!  Here's what we came up with.

SUPPLY LIST
full head mask
black foam core board
black creepy cloth 
nails & thumb tacks
black spray paint 
two black sheer drapery panels
tension rod

First, I cut the black foam core board to a shape that resembled shoulders on top with a straight edge on the bottom.  After you cut the foam core board, the white center core will be exposed on the cut edges.  Spray paint these edges black.

Next, drape the creepy cloth over the top edge.  The cloth will create the look of arms as it drops to the sides.  Nail the foam core to the wall, at the top of the door, with the straight edge just above the door jam.  

After your foam core cutout is attached to the wall, position your head mask where you want it and tack it from the inside with a few thumb tacks.

For the illusion of a body, we gathered two ready-made, black sheer panels onto a tension rod and placed it on the inside of the door jam.  Your guests have to spread the curtains apart and walk through!  For an added touch of creepy, make skeleton hand drapery hold backs to secure the panels for easy passage!


This idea can be modified many ways.  Next time maybe a creepy clown or fallen angel?   Standing at about 9' tall, it's among one of my favorite props we created in our Sinister Sisters private home haunt.

Check out our Pinterest page for more Halloween decorating ideas! 

Follow and "like" us on Facebook! http://www.facebook.com/public/Damato-Danali